 I admit, I didn’t give much thought to building a collection of dowry items or trousseau when I began dating my husband. We met while I was in high school and, more because it was a useful piece of furniture, my parents gave me a ceder hope chest as a graduation gift.
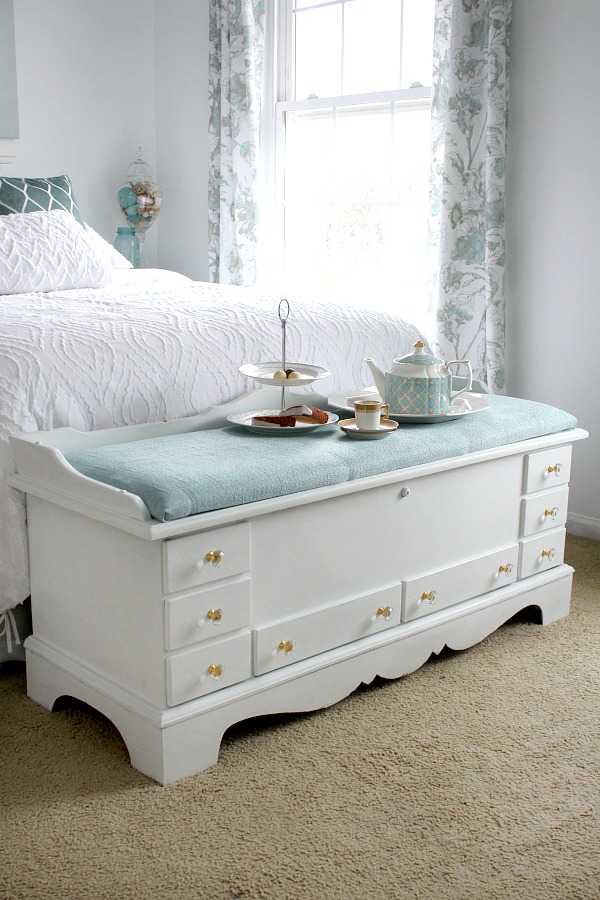
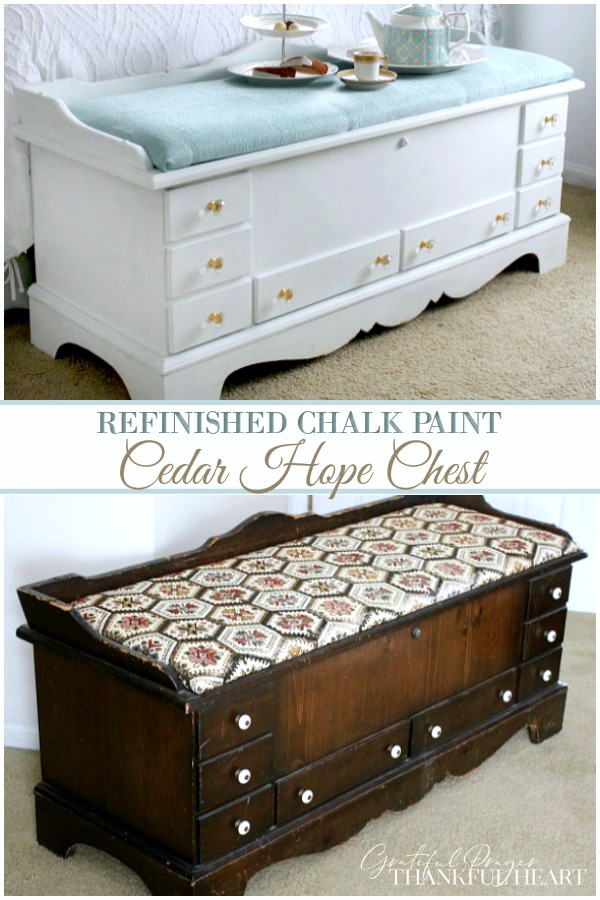
I just refinished this vintage chest with chalk paint and I am really pleased with the results.
Grateful Prayer Thankful Heart is a participant in the Amazon Services LLC Associates Program, an affiliate advertising program designed to provide a means for us to earn fees by linking to Amazon.com and affiliated sites. We will only recommend products we use, love or think are informative and helpful.
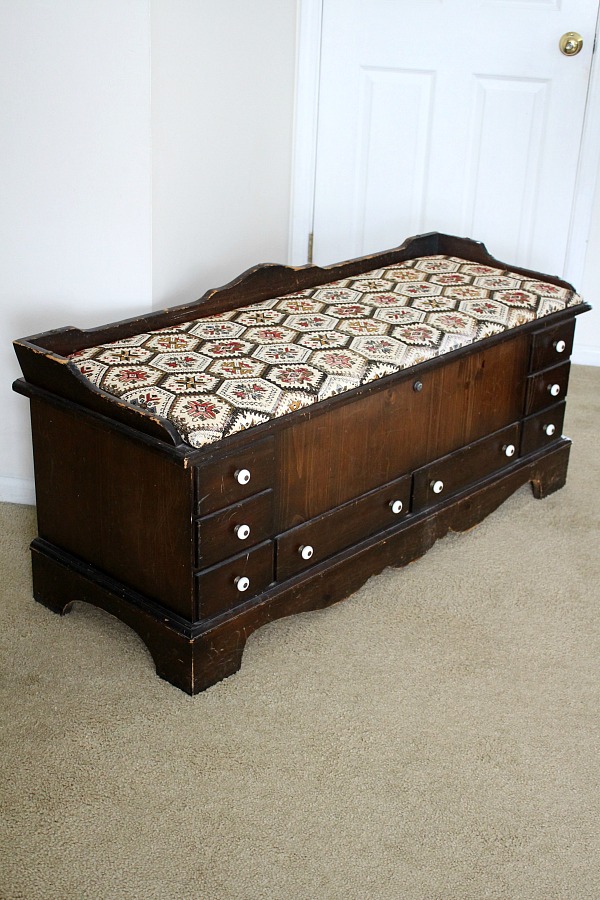 During the mid-seventies, dark pine furniture was popular and I remember picking out my favorite chest, mainly for the needlepoint on the top. We probably stored homemade crocheted blankets in it but it’s primary function was used for seating. Aside from the scratches and dings common in soft pine, I think it has held up pretty well for 43 years of use.
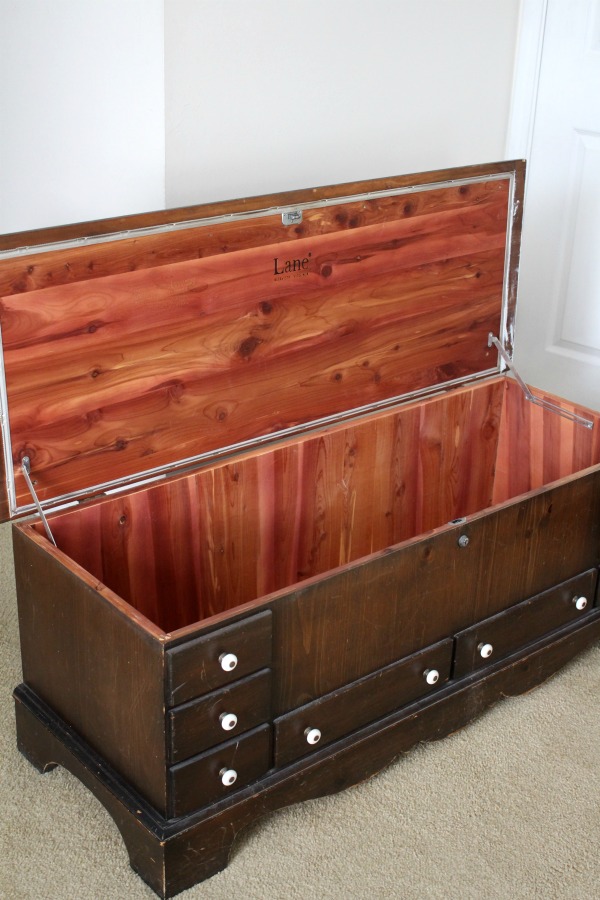 The inside is still almost like new. But, I eventually grew tired of the dark wood. I thought for ages about painting the hope chest and maybe because I knew of the horror it would have caused my parents, it remained dark and less than attractive.
Refinished Cedar Chest with Chalk Paint
All my hesitation and fears were relieved with the outcome and I am totally happy with my new hope chest.
Choosing Paint for refinished cedar chest
My kids are champs of curbside and hand-me-down furniture remakes and they most often use chalk paint. So this was my chance to set aside my go-to latex paint that always required multiple coats and a a good sanding before painting. Chalk paint requires little prep and the paint goes a long way.
Getting ready
- remove the knobs and screws
- wipe down the surface using window cleaner and a lint-free cloth making sure dust and particles are wiped away.
- place a drop cloth or cardboard beneath the piece to protect flooring
Supplies
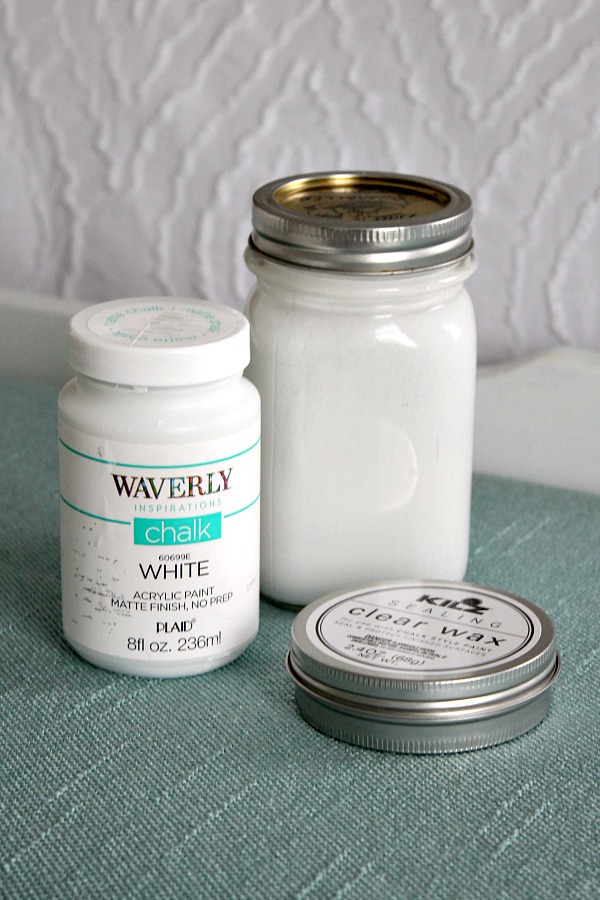
- 8fl oz. jar of Waverly Inspirations Chalk Acrylic paint with a matte finish. (best price is to purchase at Walmart)
- paint brush
- Jar for paint because I didn’t want to paint from the container
- rag to wipe drips or splatters
- Kilz Sealing Clear Wax (I purchased this at Walmart)
- paint brush
- Clean lint-free cloth
- Super fine steel wool
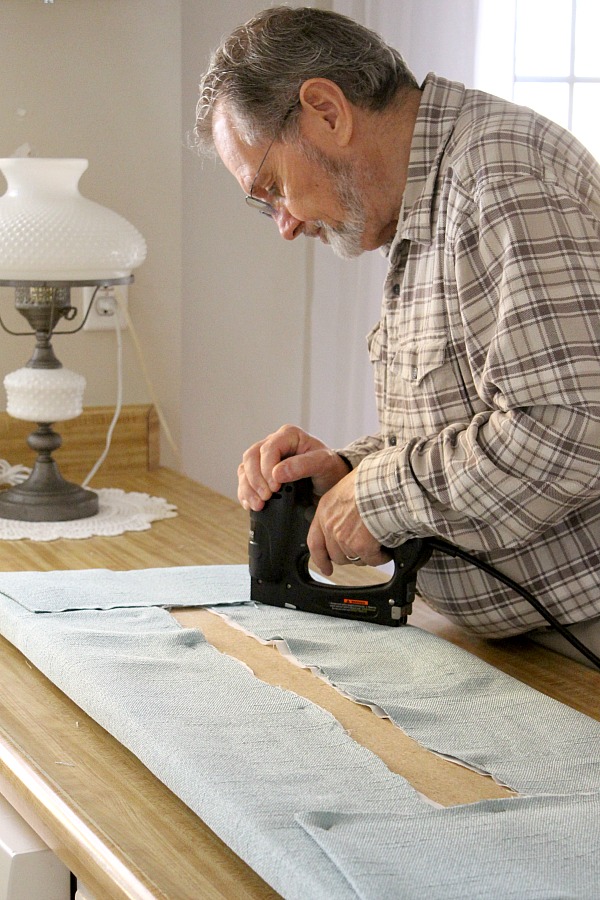
- Staple gun if you are planning to recover a seat cushion
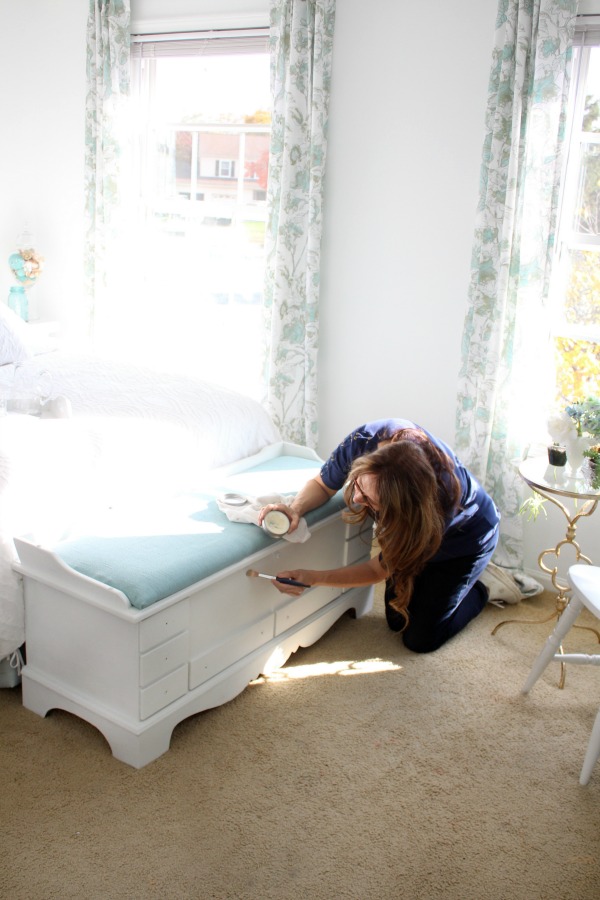
Painting Process of Refinished Cedar Chest
I didn’t get photos of the painting process mainly because I worked on my bedroom floor in the dim of the early morning, running up and down the steps between coats. I really wanted to splash on the first coat before I could change my mind.
Here is the painting process recommended by the company:
- Apply 2 coats of paint in thin, smooth layers. I applied three coats because I didn’t want to distress the piece and instead go for a good coverage.
- Wait two hours between coats.
- After final coat of paint, distress, if desired, using sand paper and a light hand until you get what you like.
Protecting with Sealing wax

 Be sure the paint is completely dry and free of dust and particles before waxing. I waited overnight but I’m sure this step could have been done sooner.
- Rub a thin layer of wax on with a clean, lint-free cloth or brush. THIN is the important word. If you tilt your head you should be able to see where you have applied the wax. Get it as even as possible.
- Allow the wax to thoroughly dry. After the first coat of wax dried, I, very lightly went over the surface with steal wood with the goal of making the surface extra smooth. Thoroughly wipe the surface to remove all the pieces left behind from the steal wool. I then applied a second coat of wax in the same manner.
- Finally, buff the surface for a subtle, velvety finish
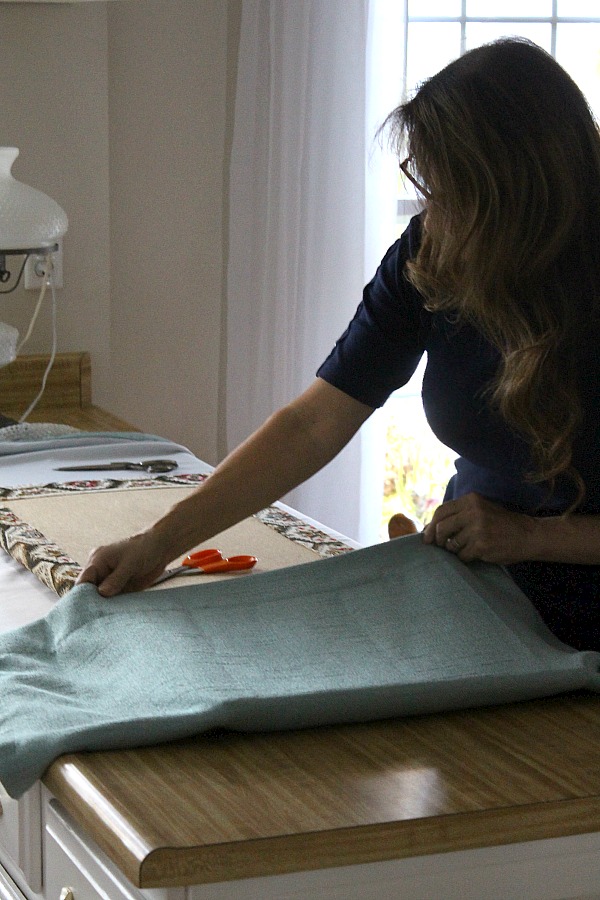
Recovering the seat cushion
I really wanted to cover the seat cushion with the same fabric as the curtains. But since the curtains were on clearance I just could not find another pair anywhere. I called store after store and searched the internet to no avail.
The fabric I used is actually another curtain panel and it was perfect covering the dark embroidered fabric original to the cedar chest. The curtain panel had a room-darkening piece making it sturdy and strong.
Replacing the old or adding New knobs
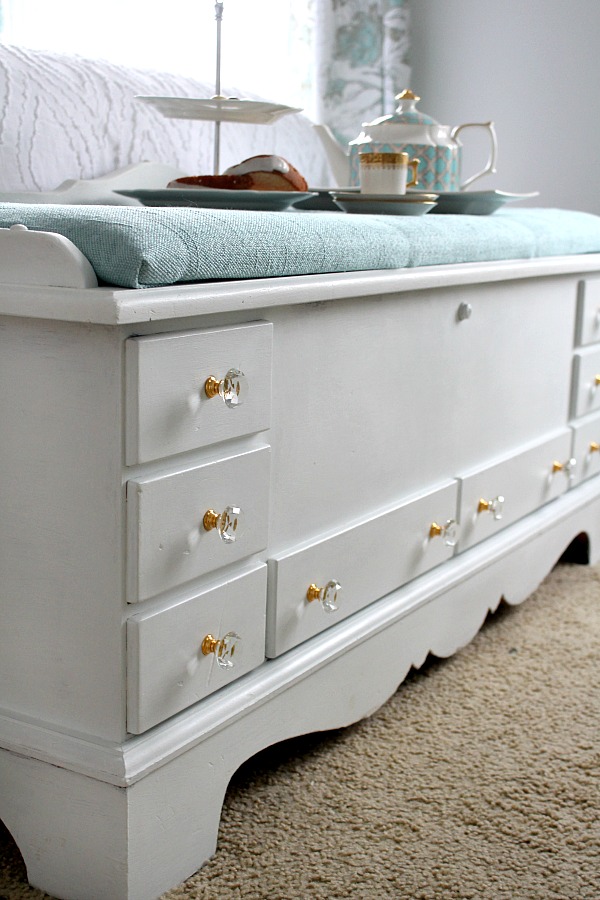
The knobs we removed from the cedar chest are in fine condition but they didn’t add the sparkle and bling I was looking for. These purchased, crystal glass knobs with a gold metal do the trick.
Refinished DIY vintage Lane cedar hope chest using chalk paint and sealing wax brought new life to a dark and dated piece of furniture. An easy makeover that looks beautiful in my Shabby chic, French Country room.
Safety Note
Lane chests manufactured up to 1987 include a lock that catches and locks shut automatically when the lid closes. This led to the deaths of a brother and sister in 2014, who got locked inside the chest and suffocated. Six other children suffered the same fate, resulting in the company’s recall on the locks in 1996, and a seventh child died just prior to the company stopping manufacture of the chests. Many people have removed the locks from the chests, but the company estimates there are still about 6 million chests of the 12 million manufactured during this period that do not have the safety locks installed. Chests with the original locks may have a different value from those without them. If the lock hasn’t been replaced, do so immediately or remove the lock for safety’s sake.
You might also like…
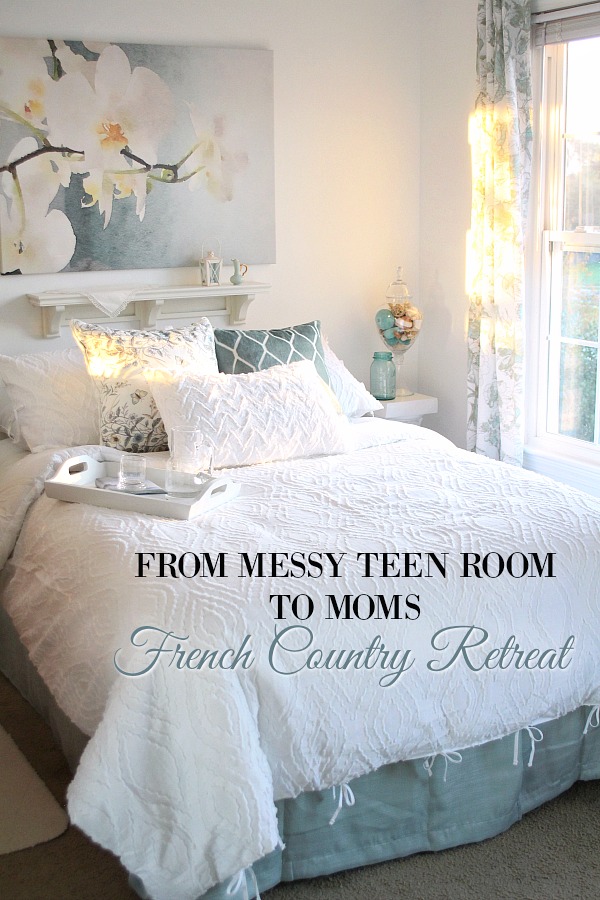
From Messy Teen Room to Moms French Country Retreat


DIY Wall-mounted Jewelry Organizer
 Our Newsletter is published once every three weeks. Each issue is timely and helpful, jam-packed with food, crafts, occasional DIY, gardening and faith resources. Relevant and seasonal posts to inspire and guide you with current trends. Available only to those who request it, so please accept our invitation to stay connected and join the Grateful Prayer Thankful Heart community. Just click the subscribe button below.

Oh my goodness! I had the same one exactly. First Christmas present from my to be husband. After we married in ‘78. We moved a lot & side leg broke, I was dumb @ sold to a friend. She recently died:(. I had just asked her granddaughter about it? I’m praying to get it back but it may mean a lot to her as well. I don’t know. I get sick at my stomach for being so young & dumb. I asked for a picture if she can’t bear to part with it. Yours is beautiful . I pray it’s not important to you.
I am hoping mine turns out as well. Question for you, did you paint the entire chest, including top under the tapestry covering as well as the back & underneath? Just wondering. Thanks!
Hello Barb,
I did not paint the bottom of the hope chest but I did paint the back. I painted just a few inches on the top since it will always be covered by the tapestry. I am looking forward to hearing how your projects turns out. Please let me know how it goes 🙂
Kindly, Lorraine
I just bought this exact same chest off of someone on Facebook and this really inspired me to refinish!!! Great job!!! It’s not in as good of condition but I’m excited to try!
Hi Jessica,
Oh, I am excited to hear about your progress refinishing your hope chest! Do let me know how it turns out 🙂
Kindly, Lorraine
My husband gave me this exact hope chest while we were dating in the early 70’s. It’s now sitting in the attic because it’s dark and doesn’t match our furniture now! You’ve inspired me to take the plunge and give it a face lift! I just finished my china cupboard with chalk paint and LOVE it! I had forgotten about my hope chest in the attic and I saw your project while scrolling through Pinterest. Thanks for the inspiration!
I have this exact same chest too! My husband gave it to me while we were dating in the early 70’s. It’s now sitting in the attic because it’s dark and doesn’t match our furniture now! You’ve inspired me to take the plunge and give it a face lift! I just finished my china cupboard with chalk paint and LOVE it! I had forgotten about my hope chest in the attic and I saw your project while scrolling through Pinterest. Thanks for the inspiration!
Hi Krista,
Thank you so much for your comment! Nice to hear that your China cabinet turned out well. The hope chest will be a breeze after such a big project. Do send pics when it is completed. I would love to see it! 🙂
I struggled for years about painting my dining room table and chairs. I took the plunge and redid one chair and like it. That was just before our covid19 isolation and I haven’t had the time to proceed with the others. The chairs are not a concern but I am worried about the table top holding up with the use it will receive.
What type of paint did you use? Did you add a finish to the china cabinet? Thank you for any suggestions!
Kindly, Lorraine
Forgot to say what a beautiful job you did!
Hello Lynn,
Yes, there really is a danger. If you scroll toward the bottom of the post you will read a safety note concerning this with suggestions to make the chests safer.
Thank you for stopping by and leaving your comment!
Kindly, Lorraine
Thank you 🙂
WARNING! I love cedar chests too! Just beware of the dangers to children. Some models are death traps. Google it and you will see that children have died from suffocation because they become trapped.
Hello Lynn,
Yes, there really is a danger. If you scroll toward the bottom of the post you will read a safety note concerning this with suggestions to make the chests safer.
Thank you for stopping by and leaving your comment!
Kindly, Lorraine
Oh my goodness!! This is the EXACT Lane chest that I have! Mine was a 1st anniversary present from my hubby – 47 years ago. We’ve used it for seating, as well. It’s been thru two major floods – the last one was from hurricane Irma and I almost threw it out, but couldn’t bring myself to. Just today I started sanding-not sure if I’ll go white, as you have, or if I’ll save my needlepoint top or recover!! But, what you have done is gorgeous! And, seeing this is truly an inspiration for me to breathe deeply and forge ahead!! Thanks for sharing your lovely piece!!!
Hi Beth,
It took me a very long time to muster the courage to paint my chest mainly because I remember how strongly my parents felt that “natural” wood was never to be painted! They loved their dark pine and paneling! But I am glad I took the plunge. Please update me when you complete your project. I’d really love to see the transformation.
Best wishes!
Lorraine
I love the makeover of your cedar chest. I have one that belonged to a dear friend and I’ve not considered painting it but you’ve inspired me. I need to see where I’m going to use it in my small home.
~Adrienne~
A lovely addition to your refurbished guest room! I have my grandmother’s cedar hope chest—I would have a hard time covering that beautiful cedar (inside and out) but I do think yours looks way better painted! Just spectacular! I’ve used chalk paint a couple of times…not sure I love working with it, but it beats sanding and priming!
I have a lane cedar chest. Mine isn’t the dark wood but it could use a facelift. Yours looks beautiful. You would never know that it was 43 years old, it looks brand new