• Home
  • About
  • !!! SUBSCRIBE TO OUR NEWSLETTER – FREE GIFT !!!
  • Blog
  • Contact

Lorraine D. Hebler

  • Recipes
    • Appetizers
    • Beverages
    • Breads – Quick & Yeast
    • Breakfast & Brunch
    • Canning & Freezing
    • Entertaining
    • Holidays
    • Main Dishes
      • Beef
      • Chicken
      • Fish & Seafood
      • Pork
    • Pasta
    • Salads & Dressings
    • Soups & Stews
    • Sweet Treats
      • Biscotti
      • Cakes & Cupcakes
      • Cookies & Bars
      • Desserts
      • Muffins
      • Pies & Cobblers
      • Scones
    • Vegetables & Sides
    • Visit My Galleries
  • Crafts
    • Crochet
    • Knitting
    • More Crafts
    • Visit My Galleries
  • Faith
    • Faith Statement
    • Faith Printables
  • Home and Garden
    • Birds & Butterflies
    • Flowers Plants & Herbs
    • Home Decorating & DIY
  • Family
    • Family & Friends
    • Grandchildren
  • Resourses
    • Gift Guides
    • Photography Equipment
    • Food Styling Photo Props
    • Sock Hop Party Shopping Guide
  • Travel
  • Vintage

How to Dry Roses

By Lorraine

There's nothing lovelier than fresh cut flowers gracing your table or brightening a place in your home. But even after the blossoms begin to fade, you can continue to enjoy their beauty by drying them. This how to dry roses technique couldn't be easier. Use for crafts projects, embellishing gift packages and food gifts.
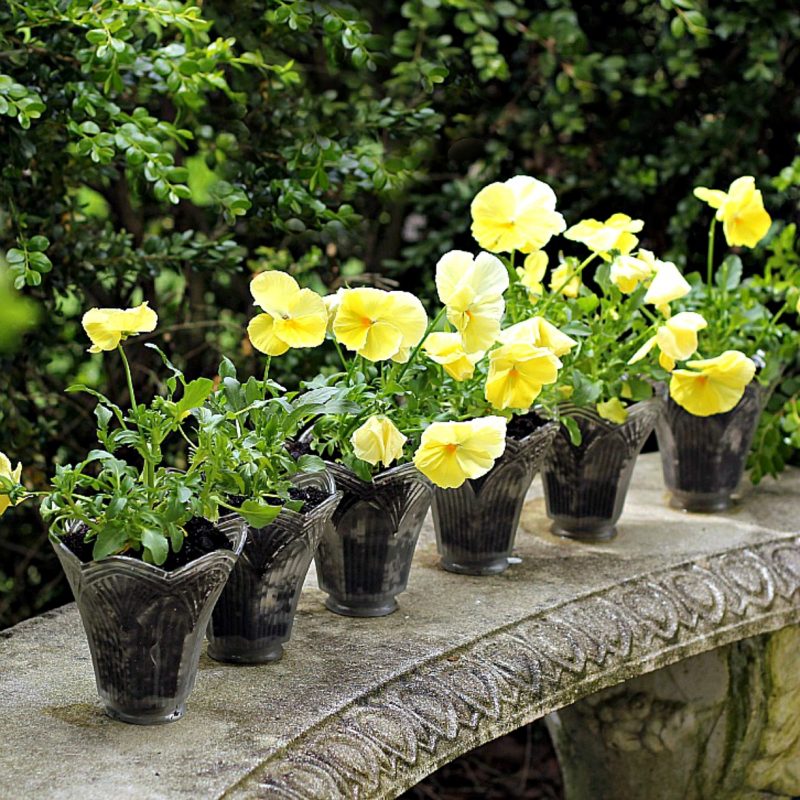
There’s nothing lovelier than fresh cut flowers gracing your kitchen table or brightening a place in your home. But even after the blossoms begin to fade, you can continue to enjoy their beauty by drying them. This how to dry roses technique couldn’t be easier.Continue Reading

Filed Under: Crafts, More Crafts Tagged With: Crafts, flowers, tutorial

Crochet Baby Bib from Vintage Pattern

By Lorraine

Sweet crochet baby bib is adapted from a vintage pattern and perfect for a toddler. Almost too pretty to use as a bib but adorable to dress up an outfit.This sweet crochet baby bib is adapted from a vintage pattern and perfect for a toddler. Almost too pretty to use as a bib but adorable to dress up an outfit. Using a pattern from my husband’s, Aunt Marie, I made a crochet baby bib for little Chloe.Continue Reading

Filed Under: Crafts, Crochet, Vintage Tagged With: Chloe, Crafts, Crochet, Erin, Grandchildren, tutorial

Hammered Flower Art

By Lorraine

Preserving springtime flowers and creating lovely art is easy by pressing and hammering blossoms onto paper.
It really warms a heart when your little granddaughter hands you a single yellow dandelion with the sweetest, cheesiest smile on her face. Then big sister offers a fistful of grape hyacinths plucked from beneath the trampoline. Preserving spring and their thoughtful gift inspired this project of hammered flower art.

Continue Reading

Filed Under: Crafts, More Crafts Tagged With: Crafts, flowers, tutorial

Crochet Cozy for Jars or Cans

By Lorraine

Super easy pattern for cute, useful crochet cozy for jars or cans. Organize your vanity, desk and arts and crafts supplies. Recycle, upcycle and repurpose into multipurpose items!

Super easy pattern for cute, useful crochet cozy for jars or cans. Organize your vanity, desk and arts and crafts supplies. Recycle, upcycle and repurpose into multipurpose items!

Cute, useful and easy to make crochet cozy for jars or cans are a great way to organize your vanity, desk and arts and crafts supplies. They work up quickly and make lovely gifts.

Continue Reading

Filed Under: Crafts, Crochet Tagged With: Crafts, Crochet, tutorial

Easter Butter Lamb

By Lorraine

Create a sweet little Easter butter lamb, covered in woolly curls with easy how-to directions. It is cute, decorative and symbolic for your holiday table.Did you grow up watching someone, maybe a grandparent, make a butter lamb?  These sweet butter sculptures traditionally accompany the Easter meal for many Russian, Slovenian and Polish families. Butter is shaped into a lamb either by hand or in a lamb-shaped mold. You might want make one for your celebration. Try these easy directions to create your own little Easter butter lamb covered in woolly curls. It is cute, decorative and symbolic for your holiday table.

Continue Reading

Filed Under: Breakfast & Brunch, Faith, Holidays, Recipes Tagged With: Bible, Easter, Faith, lamb, tutorial

Making a Brushed Metal Look Chalkboard Serving Tray

By Lorraine

Make a chalkboard and serving tray with a brushed-metal look detailed DIY how-to instructions. Great housewarming gift for newlyweds.
Our daughter, Jill and husband, Brad recently moved into a new home. Well, actually their home was built in 1917 making it a 95 year-old new home.
She wants a serving tray for an ottoman she is using as a coffee table. Her dad and I worked together to make a brushed metal-look chalkboard serving tray.

Continue Reading

Filed Under: Crafts, More Crafts Tagged With: Christmas, Crafts, gifts, Jill, tutorial

Lined Crochet Stocking for Chloe

By Lorraine

Pattern for crochet stocking for baby's 1st Christmas, It is lined with fabric to keep treasures safely inside. Just the right size for baby.
Lined Crochet Stocking for Chloe’s 1st Christmas. Our little leapling granddaughter is getting bigger and I wanted to make her something special for Christmas. So, I adapted a crochet pattern and made her a baby-size Christmas stocking that is lined with fabric so nothing pokes through the holes.

Continue Reading

Filed Under: Crafts, Crochet Tagged With: Chloe, Christmas, Crafts, Crochet, tutorial

Homemade Greek Yogurt

By Lorraine

For the past few months I have been making Greek-Style Yogurt at home. Inspired by Paula @Salad in a Jar, it took a few batches before I found what worked for me.  Because John is a huge fan of this thick, creamy, tangy and pricey yogurt, he encouraged me to keep trying. He remembered that I frequently made yogurt when our children were little using a convenient yogurt maker. That was back in the day when I pureed cooked veggies and fruits in a small grinder to feed our babies along with sterilizing every bottle and item that touched their sweet little lips!
Though time consuming, making yogurt at home isn’t hard and most of the time required is the incubation period.  Paula has an excellent and detailed tutorial with an instructional video on her blog, using the oven to keep a constant incubation temperature. I ran into a problem because, even though my oven has a temperature setting of 100 degrees which is ideal for incubation, it is actually hotter than the setting. I found that if I preheat the oven for just 1 minute, turn it off and keep the oven light on during an 8-10 hour incubation period, the yogurt comes out perfect.

Here is what I do:
Pour 2 quarts of milk (I used 2%) into a large glass container.

Microwave, stirring several times, to a temperature of 180 degrees. (It takes about 15 minutes in my microwave)


Allow the milk to cool to 110 degrees.

Pour a small amount of the cooled milk into a small bowl and whisk in 2 tsps. Greek Yogurt starter that you have purchased or saved from a previous batch.

Whisk into the large container of milk.

Cover with a lid.  Wrap the container of yogurt in a thick blanket or quilt.  Preheat oven to 350 degrees for one (1) minute and turn off.  Turn on the oven light.  Place the wrapped container of yogurt in the back corner of oven near the light bulb. Close oven door and allow yogurt to do its thing.

I wait 10 hours.  Remove yogurt container from oven.  It will be thick with some liquid puddling on top.  This is whey that will be strained off to create a thick Greek-Style product.  I gently pour off the whey and then carefully pour the yogurt into a colander that  has been lined with several coffee filters.  Allow the yogurt to drain for several hours in the refrigerator or even over night.

Discard whey and whisk the yogurt until creamy.  If desired, add vanilla extract and sweetener.  Personally, I prefer mine a little sweet but John likes his with just vanilla.

Be sure to set aside a couple teaspoons before adding vanilla or sweetener as a starter for your next batch.

Sharing @Foodie Friends Linky Party

Filed Under: Breakfast & Brunch, Recipes Tagged With: tutorial

Subway Art

By Lorraine

There are many great tutorials to make subway art.  The one I made was time consuming and the lettering isn’t as precise as if the words were stenciled or vinyl.
But it has a humble, handmade look and was relatively inexpensive.
I had several ideas before settling on this method.  I considered building the project on Photoshop and having it printed onto a canvas but didn’t want to pay the price for a large one and I was limited to the size.
I also thought about painting the lettering onto a canvas but decided to purchase a pine board that we cut to a 13-inch x 35-inch rectangle.
I printed out the words as a Word document in two different fonts.
Using a paper cutter, I cut around each word and, after sanding, priming and spray painting the board, I positioned them in a pleasing way.
  Using a stylist (seen on the lower left in photo above), I traced over the outline of each of the letters.
This was the hardest part of the project as I found it took a lot of pressure to leave an indentation in the board.
Each word was painted with white acrylic paint that I thinned just a little with water, using a thin paintbrush.
I sanded the edges of the board and some areas on the face as well.
 A coat of sealer and a light wash of brown antiquing paint and a final coat of sealer finished the project.
I debated whether to drill of hole on the back, add a sawtooth hanger or add a hook to the top for hanging. I had a brass hook that I had saved from an old lamp.  I thought the brass was too bright so I spray painted it black and screwed to the top of the board.  
That’s it!

Filed Under: Crafts, Family, More Crafts Tagged With: Crafts, Erin, gifts, tutorial

Crochet Rosettes

By Lorraine

Make the cutest headbands for your little girl covered in roses. Free and easy pattern to crochet rosettes for crafting.Little girls just love dressup and pretty things. Make a few crochet rosettes and attach to a headband for a sweet lil’ noggin you know.
Continue Reading

Filed Under: Crafts, Crochet Tagged With: Crafts, Crochet, gifts, tutorial

Simple Re-Purposing

By Lorraine

Don't trash those globes from the chandelier you just replaced. Up-cycle them into the cutest flower pots by simple re-purposing.
 
When replacing the light over your kitchen or dining room table, save the glass lamp shades to up-cycle. Usually the shades or globes are in great condition and too nice to toss in the trash. With just a few supplies and simple re-purposing, you can make sweet little pots to fill with springtime flowers.

Continue Reading

Filed Under: Crafts, More Crafts Tagged With: Crafts, flowers, Home and Garden, tutorial

Crochet Easter Egg

By Lorraine

Is there a new little sweetheart in your family? Though not typical Easter colors I think this pink and blue crochet Easter egg makes a cute baby’s 1st Easter keepsake. You can make a solid color egg, use variegated yarn or choose any combination of colors for your egg.

Continue Reading

Filed Under: Crafts, Crochet Tagged With: Crafts, Crochet, Easter, tutorial

Little Wooden Cross from Sticks

By Lorraine

 
A humble little wooden cross made from sticks gathered from your backyard. With or without an attached bible verse it is a sweet Easter remembrance and decoration.I just love the simplicity of this project. Easily made from sticks gathered from your yard, a humble little wooden cross is so symbolic. Attach a tag with the bible verse from Luke 2:11, “a Savior has been born to you”, and it is perfect as you celebrate Easter or even Christmas. These little stick crosses are a sweet and easy holiday craft to make for or with kids.Continue Reading

Filed Under: Crafts, Holidays, More Crafts Tagged With: Bible, Crafts, Easter, Grandchildren, tutorial

Crochet Easter Decorations

By Lorraine

Sweet vintage pattern for crochet Easter eggs. Crochet in pretty pastel colors and fill a basket or bowl for a lovely and decorative holiday centerpiece. Pattern works up quickly and uses little yarn.Sharing the sweet vintage pattern for crochet Easter eggs. Crochet in pretty pastel colors and fill a basket or bowl for a lovely and decorative holiday centerpiece. Pattern works up quickly and uses just a little yarn.
Continue Reading

Filed Under: Crafts, Crochet, Vintage Tagged With: Crafts, Crochet, Easter, Mommy, tutorial

Crochet Easter Egg

By Lorraine

Easy pattern for Crochet Easter Egg that separates to open. Fill with a little Easter grass and tuck in candy or small toys and tie to close. Surprise children in their baskets or use in a pretty holiday centerpiece.Each Easter I bring out a basket full of crochet decorations that my mom and I made way back in 1978. Here is an easy pattern for Crochet Easter Egg that separates to open. Fill with a little Easter grass, tuck in candy or small toys and tie to close. Continue Reading

Filed Under: Crafts, Crochet, Holidays Tagged With: Crafts, Crochet, Easter, tutorial

Crochet Chocolate Diorama Easter Egg

By Lorraine

Peek inside this sweet crocheted chocolate diorama Easter egg decorated with faux frosting and embroidered scrolls. Cute pattern for holiday décor tablescapes or filling Easter baskets.Crochet Chocolate Diorama Easter Egg, is a crochet project my mom and I came up with during one of her visits when I was living in Ohio. We were several states away from one another and I was expecting my first child. By the time we were finished we had crocheted a basket full of sweet Easter decorations that I bring out and displayed each spring.

Continue Reading

Filed Under: Crafts, Crochet, Holidays Tagged With: Crafts, Crochet, Easter, Mommy, tutorial

Newer Entries
Previous Entries
Hi! I'm Lorraine. Welcome to Grateful Prayer Thankful Heart. A place to find food for your tummy, projects for your hands, and encouragement for your heart.

Theme by 17th Avenue · Powered by WordPress & Genesis